The loading speed of your website is one of the key factors in ranking higher in the Google search engine.
Its a known fact, Google uses more than 200 signals to rank any content in its search engine, and ‘Website Loading Speed‘ is one of them.
The ideal website loading time is around 2 to 5 Seconds. However, with every increase of 1 second may increase your bounce rate drastically.
- Loading Speed of a Website
- Pagespeed Insight
- GT-Metrix Website Testing Tool
- Pingdom Speed Test
- Free steps to Improve Loading time and Increase Speed of your Website
- #1. Change your WordPress Theme
- #2. Optimize Images
- #3. Eliminate Render blocking CSS and/or JS files
- #4. Serve images with correct dimensions
- #5. Defer Off-Screen image loading
- #6. Install Asset Cleanup Plugin
- #7. Load Mail Chimp JavaScript file locally
- #8. Remove un-required plugins from your list
- #9. Lazy load your embedded videos
- #10. Define Page Rule in Cloud flare account
- Over to you
Loading Speed of a Website
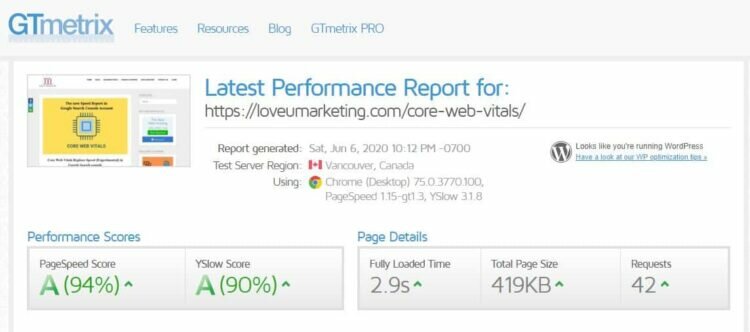
If you have not checked the loading of your website yet, I suggest checking speed using website testing tools like Google Page Insight, GT Metrix, or Pingdom first.
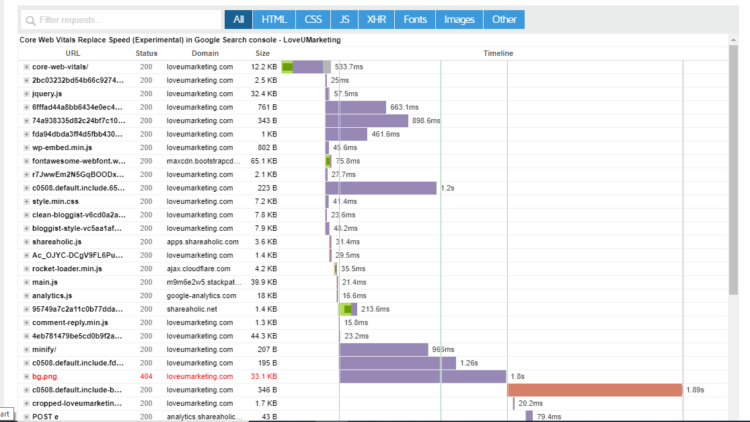
Here are the loading score of my blog.
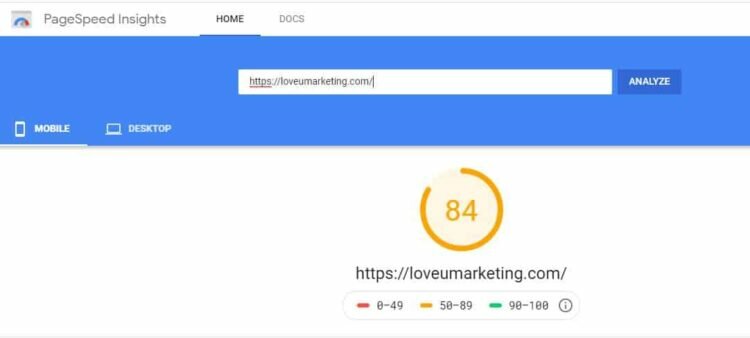
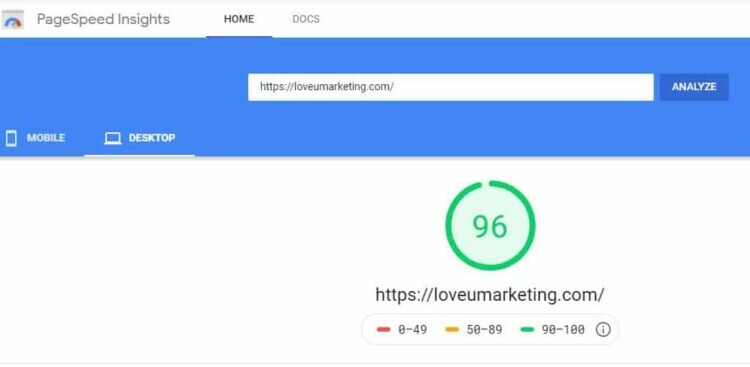
Please See:
- As per Google Page Insight, the loading speed of my blog on mobile is only 84/100. This is because Google has suggested me to serve the images in nextgen formats like webp, JPEG 2000, etc. And, I don’t want to install an additional plugin for the same.
- Never try to get 100/100 scores in the website speed test of your website. Trust me, there is no need for it. Google itself does not score 100 out of 100 in this report. For more information please check out the below snapshot.

So just imagine. If Google does not score 100/100 then how you can?
You can also do the website speed test of any websites (particularly, the leader in your industry), and trust me no one will score full marks in loading speed tests.
The loading speed of the website depends on many factors and even the type of websites. I can’t score 90+ on an e-commerce website easily.
Hence, the attempt should be made to improve the loading speed to the extent possible. But, remember, as mentioned earlier, with every website speed optimization of 1 second in the loading time of your website, it will have a serve impact on your website.
Now, before moving forward with the article, let’s have a brief introduction of website loading speed test tools first.
Pagespeed Insight
Pagespeed Insight is a tool owned by Google to analyze the content of the web page and share relevant suggestions to load websites faster.
If you want to rank your content in Google Search Engine, you can’t ignore the Pagespeed scores completely. Being owned by Google, it plays an important role in improving the loading speed of your website.
But unlike GT-Metrix and Pingdom, it does not provides a detailed analysis of the website speed test.
GT-Metrix Website Testing Tool
GT-Metrix is another great tool ( owned by GT.net) for measuring the loading speed of your website on a scale of 100.
It used a combination of Google Page Speed Insight and YSlow to generate scores and recommendations.
Unlike Google PageInsight, it also has an option enable to select the physical location for doing the website speed test.
Pingdom Speed Test
Pingdom is another great tool for measuring the loading speed of your website.
Besides free speed test your website, it also provides many other services like Visitors’ Insight, Server Monitoring, Server Speed Test, etc.
Like GT Metrix, it also provides the detailed analysis of the given web page.
Free steps to Improve Loading time and Increase Speed of your Website
So, have you checked your site speed using these tools and now ready for improving it?
So, What are we waiting for? Let us discuss, how I managed to do the website speed optimization of my website?
Below, I have mentioned all steps that I undertook to improve the loading speed of my website.
#1. Change your WordPress Theme
Your theme plays a deciding role in the loading speed of your website.
If you select a slow-loading WordPress theme, you will definitely be going to have a slow-loading website too.
I strongly suggest to select a simple and less weight theme for your site.
Remember, you do not require a theme with lots of features built-in it. A simple theme with only the required features is good enough for you.
#2. Optimize Images
In more than 80% of cases, the uploaded Images is one of the biggest reason for the slow loading speed of the website.
It is obvious that large images will take more time to load than the smaller ones. Hence, an attempt should be made to reduce the size of the images without compromising its quality.
Yes, compressed the image file ( to the extent possible) before uploading the same on your website.
Problem: Optimize Images
Solution: Below are the list of solutions that you can implement to resolve this problem.
- For already uploaded images, I suggest installing free WordPress plugins for image optimization. Once optimized, you can remove the same from your website.
- For new images, ensure you optimize it before uploading the same on your website. You can use this free desktop tool to optimize your images easily.
- You can download the optimized images directly from the Pagespeed Insight or GT-Metrix and upload the same using the FTP server.
#3. Eliminate Render blocking CSS and/or JS files
Render blocking CSS and/or JS files refers to resources that blocked the first paint of your website.
In simple words. these are scripts that needs to be loaded instantly before your visitors see the content on your site.
Here, the term elimination does not mean removing it. Instead, load them in such a way that your content appears first before loading these scripts.
Problem: Render blocking CSS and/or JS files
Solution: I resolved this problem by minifying scripts using the W3 Total Cache plugin and Cloudflare.
In a cloud flare, there is an option for minifying output. All you need to do is enable the ‘Auto Minify’ option and ask to minify all HTML, CSS, and JS files on your site.
You will find this option under ‘Speed’ tab of your Cloudflare account.
Next, you can also do this using your cache plugin. Here, in my case, I am using the W3 total cache plugin for minifying outputs.
All you need to do is just enable the ‘Minify’ option from the ‘General Setting’ tab and thereby add URLs of the script to it.
Please See
- Some of the script files may break your website theme. I suggest, once minified, please clear caches and recheck your website thoroughly ( both in mobile and desktop devices as well).
- If you don’t know how to do minify the CSS and/or JS files then you can change the minify mode to ‘Auto’ under the ‘General Setting’ tab. Auto mode will take care of everything automatically.
#4. Serve images with correct dimensions
This is the fourth thing that I implemented on my website. I used regenerate thumbnails to change the dimension of uploaded images.
Do you know? Based on your defined dimensions (under ‘Setting’ page of your WordPress’s Dashboard), WordPress automatically creates several copies of your uploaded images.
Now, when you change the theme, many new dimensions will get added and others will useless.
Hence, You need to regenerate thumbnails as per your new theme.
#5. Defer Off-Screen image loading
To defer offscreen images in WordPress means to wait to load the images which we can’t see yet.
In simple words, it will load only those images on the screen, which is visible to you. Any below the fold images will not get loaded until you scroll to it.
In a technical language, it is known as Lazy Load Images.
You can easily achieve this by installing any Lazy Load plugin on your site. Moreover, if you are using the W3 Total Cache plugin, you can enable this feature from its ‘General Setting’ page.
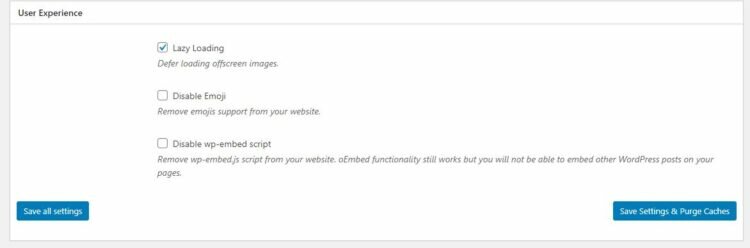
You can also disable the Emoji and embed javascript if not using it. I did it manually by editing my theme.
Here is the code that I used to disable it. I have just copy and paste the below code in my Function.php file of WordPress theme.
/**Remove Tags from Worpdress to increase speed */

remove_action('wp_head', 'rsd_link'); //removes EditURI/RSD (Really Simple Discovery) link.
remove_action('wp_head', 'wlwmanifest_link'); //removes wlwmanifest (Windows Live Writer) link.
remove_action('wp_head', 'wp_generator'); //removes meta name generator.
remove_action('wp_head', 'wp_shortlink_wp_head'); //removes shortlink.
remove_action('wp_head', 'feed_links', 2 );  //removes automatic feed links
/** Remove Version from JS and CSS to Improve Cache and thereby Speed of the Website */
/*remove version from style and script links*/
function remove_cssjs_ver( $src ) {
if( strpos( $src, '?ver=' ) )
$src = remove_query_arg( 'ver', $src );
return $src;
}
add_filter( 'style_loader_src', 'remove_cssjs_ver', 15 );
add_filter( 'script_loader_src', 'remove_cssjs_ver', 15 );/** Do not load Emoji */
remove_action('wp_head', 'print_emoji_detection_script', 7);
remove_action('wp_print_styles', 'print_emoji_styles');I know you’re already aware of these steps. But, below I will share a few new steps that improve the loading speed of my website drastically. Trust me, it worked like charm for me.
#6. Install Asset Cleanup Plugin
This plugin is a must if you want to improve the loading speed of your website.
Asset Cleanup will scan your website and detects all the assets that are being loaded.
Next, you can select the CSS and/or JS files that are not necessary to load and disable it.
This will remove all the unused scripts on your website and thereby reduce bloating.
This plugin has a separate setting for your homepage, posts, and pages. So, you can easily block the unused scripts based on your website location.
This will remove all the unused Javascripts and CSS files from loading on your site.
For example, there is no need to load Java scripts related to the ‘Contact Form 7‘ plugin on all webpages.
You can blocked it on your entire website except Contact Us page.
Similarly, you can also disable java scripts related to ‘Table of Content‘ on the entire website except for your WordPress’s post page.
#7. Load Mail Chimp JavaScript file locally
I am using Mail Chimp for Email Marketing.
Now, being an external website, W3 Total, or any other cache plugin will minify this output.
In such a case, the only way to eliminate render-blocking external JavaScript and/or CSS file is loading locally.
Yes, all you need to do is copy the given Javascript and/or CSS files locally on your server and thereby load it directly from your domain.
In my case, I copy the JavaScript file (local-mc-validate.js) of Mail Chimp and upload it on my server using FTP.
Next, I change the sign-up code accordingly.
That’s it. Now, the Javascript file of Mail Chimp will get loaded directly from my server and it can be minified using my cache plugin or Cloudflare account.
This is how my Mail Chimp code looks after loading the ‘mc-validate’ javascript locally.
<! – Begin Mailchimp Signup Form – >
<link href="/Mail_Chimp.css" rel="stylesheet" type="text/css">
<style type="text/css">
#mc_embed_signup{background:#fff; clear:left; font:14px Helvetica,Arial,sans-serif; }
/* Add your own Mailchimp form style overrides in your site stylesheet or in this style block.
We recommend moving this block and the preceding CSS link to the HEAD of your HTML file. */
</style>
<div id="mc_embed_signup">
<form action="https://loveumarketing.us19.list-manage.com/subscribe/post?u=159bdef7b168069e1f946fc3e&id=4bd230caf0" method="post" id="mc-embedded-subscribe-form" name="mc-embedded-subscribe-form" class="validate" target="_blank" novalidate>
<div id="mc_embed_signup_scroll">
<h2>Subscribe to our Newsletter</h2>
<div class="indicates-required"><span class="asterisk">*</span> indicates required</div>
<div class="mc-field-group">
<label for="mce-EMAIL">Email Address <span class="asterisk">*</span>
</label>
<input type="email" value="" name="EMAIL" class="required email" id="mce-EMAIL">
</div>
<div class="mc-field-group">
<label for="mce-FNAME">First Name </label>
<input type="text" value="" name="FNAME" class="" id="mce-FNAME">
</div>
<div class="mc-field-group">
<label for="mce-LNAME">Last Name </label>
<input type="text" value="" name="LNAME" class="" id="mce-LNAME">
</div>
<div id="mce-responses" class="clear">
<div class="response" id="mce-error-response"></div>
<div class="response" id="mce-success-response"></div>
</div> <! – real people should not fill this in and expect good things - do not remove this or risk form bot signups-->
<div aria-hidden="true"><input type="text" name="b_159bdef7b168069e1f946fc3e_4bd230caf0" tabindex="-1" value=""></div>
<div class="clear"><input type="submit" value="Subscribe" name="subscribe" id="mc-embedded-subscribe" class="button"></div>
</div>
</form>
</div>
<script type='text/javascript' async src='/local-mc-validate.js'></script><script type='text/javascript'>(function($) {window.fnames = new Array(); window.ftypes = new Array();fnames[0]='EMAIL';ftypes[0]='email';fnames[1]='FNAME';ftypes[1]='text';fnames[2]='LNAME';ftypes[2]='text';}(jQuery));var $mcj = jQuery.noConflict(true);</script>
<!--End mc_embed_signup-->#8. Remove un-required plugins from your list
Keep your website simple by removing the un-required plugins from your site. In my case, I removed two plugins from my list.
- Rate My Post
- Content Block
Here, you need to Cost-Benefit analysis to decide which plugins are important for you when compared to the loading speed of your website.
Currently, I am using ten plugins on my website.
#9. Lazy load your embedded videos
Like images, you can also lazy load the embedded videos on your site.
This can be easily done using the WP YouTube Lyte plugin on your WordPress website.
WP YouTube Lyte allows you to “lazy load” your video’s, by inserting responsive “Lite YouTube Embeds”.
Further, this will also remove render blocking error of YouTube scripts.
Yes, when you embed any youtube video within your blog post, it loads a few CSS and/or JS files on your site.
These files will eventually increase the loading time of your website.
The WP Youtube Lyte plugin will resolve this problem by inserting a responsive script called “Lite YouTube Embeds”.
These look and feel like normal embedded videos, but it loads the YouTube-player only when clicked on.
Hence, the CSS and/or JS files will not load unless the reader clicks on the embedded youtube video.
#10. Define Page Rule in Cloud flare account
This was the last step I took to improve the loading time of my website. I define the Page Rule in the Cloudflare account and it worked like charm.
For a free cloud flare account, only three-page rules are available. But, don’t worry, to increase the loading speed, the only one-page rule is capable enough.
But, before moving forward with this step, I suggest you please check your ‘Cache Status’ first.
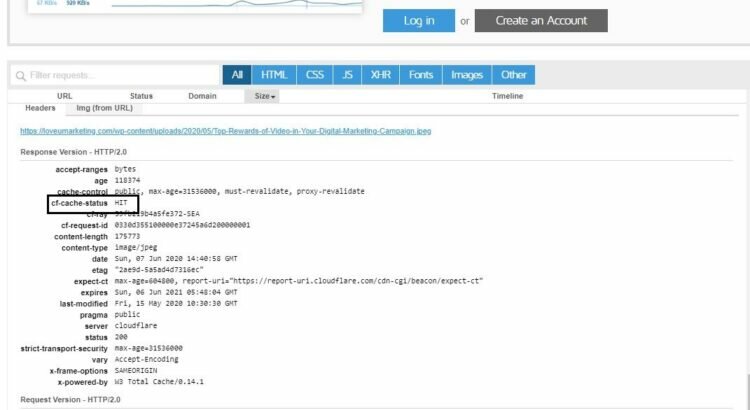
In my case, it is appearing as ‘HIT’ because I have page rule enabled for my entire website. But, if you have not defined any page rule yet, then the status will be something else other than the ‘HIT’.
Below I have explained the different types of Cache Status for your reference.
| cf-cache-status | Meaning of cf-cache-status |
| HIT | HIT status means Cloudflare found your resources in the cache |
| MISS | MISS status means Cloudflare looked for your resources in the cache but did not find it |
| BYPASS | BYPASS status means Cloudflare has been instructed not to cache this resource |
| EXPIRED | EXPIRED status means the cache is expired now on cloudflare server |
| DYNAMIC | DYNAMIC status means the resource is not cached and there is no explicit setting to configure it |
Now a question may arise? How to define a ‘HIT’ status for my cache status?
The answer to this question is simple. You can do this by defining the ‘Page Rule’ in your Cloudflare account.
Below, I have defined the step by step instruction to define the most optimum page rule on your free cloud flare account.
- Go to Page Rules tab from the header menu
- Click on ‘Create Page Rule’ option
- Define Page Rule as per the below-given snapshot
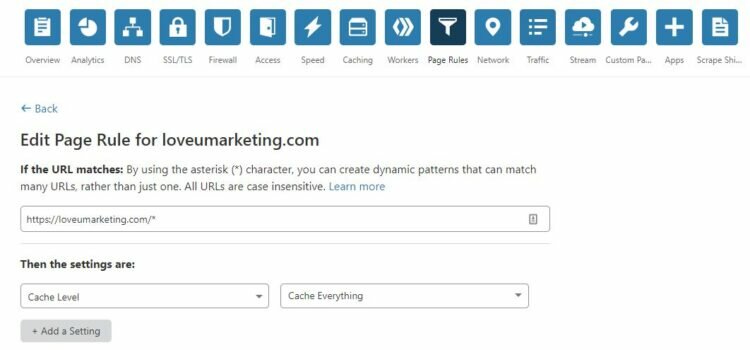
That’s it. Click on ‘Save’ button to define the page rule for your site.
Now, remove caches and re-test your website once again after sometime.
I am sure, this time, you will ‘HIT’ status in your report and even your reduce server response times (ttfb) error will be gone.
Yes, this will improve your server response time, and thereby you will not find this error in your report anymore.
Post creating the Page Rule, there will be higher chances that you will face problems with ‘Cache’ in your WordPress Dashboard. If this is the case, then create one more page rule for your dashboard and disable ‘Cache’ for it. This can be easily done by using URL https://domainname.com/wp-admin/*
Over to you
Above all, are the various steps that I took to improve the loading speed of my website. Post implementing these steps, my website load within 1 second for desktop and 3 seconds for the mobile phone.
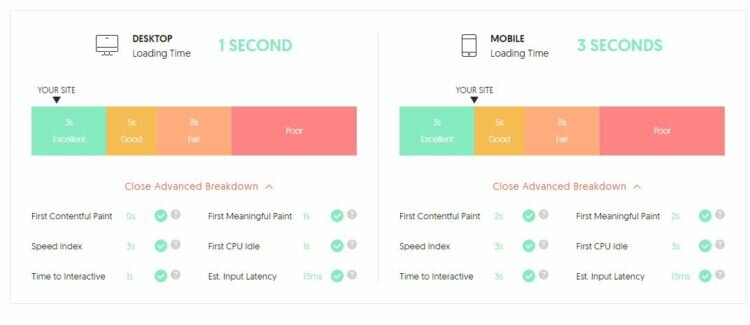
Above all, are the various steps that I took to improve the loading speed of my website. Post implementing these steps, my website load within 1 second for desktop and 3 seconds for the mobile phone.
Further, if you think, we have missed out on any important suggestions here than you can contact us or share the same in below comment box.
We will be happy to include your suggestion in our list.
Hi, just wanted to thank you for sharing the Cloudflare page rule trick. I was aware of and had already applied all other recommendations but this one saved me approx 2s in page load time!
That’s Great. I am happy that the page rule trick helped you in increasing the loading speed of your website. If you need any help, feel free to comment or contact us.